|
Tear-Away Canvas Instructions
 Tear-away Canvas
 |
By using tear-away
canvas (waste canvas), a design can be cross-stitched directly
onto any type of fabric such as T-shirts and sweatshirts.
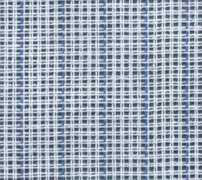
Tear-away canvas comes in many stitch counts and looks like
pettipoint canvas (type of needlepoint canvas) except every
fifth thread set (one direction only) is colored
blue. Tear-away canvas is not woven like needlepoint
canvas but is held together with sizing (water-soluble glue).
The canvas is basted (temporarily stitched) onto the fabric.
The counted cross-stitch design is stitched over the tear-away
canvas and the fabric. Once the counted cross-stitch stitching
is completed, the basting is removed, the fabric is soaked
in water to remove the sizing, and each strand of the tear-away
canvas is pulled out. Only the counted cross-stitch
design remains
on the front surface of the fabric.
|
Supplies Needed:
1. tear-away canvas
2. interfacing or a thin piece of solid-colored cloth that does
not fray. The interface will help stabilize the cross-stitch on
the fabric (especially stretchable fabrics such as T-shirts and
sweaters). The interface is not necessary on heavy fabrics such
as denim jeans.
3. counted cross-stitch
chart
4. thread
5. needle
6. scissors
7. tweezers (optional)
Instructions:
1. Determine the size of the counted cross-stitch design, add at
least a one inch border (two inches is better), and cut the correct
size of tear-away canvas. You will need the extra canvas thread
of the tear-away canvas border to help remove the canvas after the
stitching is finished.
2. Mark the center of the design on the chart and on the tear-away
canvas.
3. Cut a piece of interfacing the same size as the tear-away canvas.
4. Place the canvas on the front surface of the fabric to be embellished
with counted cross-stitch. Place the interfacing on the backside
of the fabric. The fabric is between the interfacing and the canvas.
5. Sew large running stitches (basting) around the outside edges
to temporarily hold the interfacing, fabric, and canvas together.
6. By using the chart, find the nearest cross-stitch to the center
of the design. Begin to stitch the design.
7. Once the cross-stitch is done, remove the basting stitches.
8. Gently pull up the excess interfacing from around the stitching
and trim the interfacing. Do not trim the tear-away canvas. 8. Soak
the fabric in water to remove the sizing from the canvas.
9. Pull out the canvas strands one at a time. A pair of tweezers
will help with stubborn to remove strands. Hint: On stiff
or bulky fabric, the canvas strands may be very difficult to remove.
A gentle back and forth motion of the strands with the tweezers
or picking at the strands through the cross-stitches with a pin
will help to remove the canvas.
10. Launder the clothing to remove any remaining sizing residue.
|
